
How to Add a Sunroom to a Cottage for Year-Round Use
A cottage sunroom can be designed for year-round use by choosing a suitable location, planning its connection to the cottage, and deciding how it will be heated and cooled. If you’re considering how to add a sunroom to a cottage, start by matching the room’s orientation and foundation to the site, then plan for insulation and comfort through changing Muskoka seasons. Heating and cooling can include HVAC, ceiling fans or electric baseboard heaters, depending on the space and how you want to use it.
You want more than extra space: you want a bright place to enjoy the lake, trees and fresh snow without feeling cut off from the cottage. The right choices depend on sunlight, weather exposure, the existing structure and whether you expect to use the room in winter. This guide explains how to weigh those decisions, connect the addition to your cottage and plan a sunroom that feels comfortable throughout the year.
Key Takeaways
- Compare sunlight, lake views and weather exposure before choosing where the sunroom will sit.
- Plan glazing and insulation around how you’ll heat and cool the space through Muskoka’s changing seasons.
- Choose a three-season or four-season design based on when you want to use the room, especially during winter.
- Account for structural support when connecting the sunroom to your cottage, including any new opening in an exterior wall.
- Match the foundation and attachment approach to your cottage’s existing deck, slab, crawl space or basement.
Choosing a location based on sunlight, views, and weather exposure
Start by matching the sunroom’s position to your view and the way sunlight moves across the cottage. In northern climates, south-facing windows receive the most light each day. An eastern exposure brings morning sun, followed by shade that can ease cooling needs. West-facing glass may take in strong afternoon sun and need shading. North-facing rooms receive less light and can feel cool and damp in northern climates.
Walk the property at different times of day before settling on a location. From a south-facing spot, check whether the roofline or nearby trees block the lake view. From the west side, notice where late-day glare falls. Also consider weather exposure around the cottage: a sheltered wall may feel different from an open shoreline. Compare the view from inside the planned addition, not only from the deck, because window placement and framing affect what you see.
Then examine how the new construction will meet the cottage. Note the existing siding, roof edge and drainage path where the sunroom will connect. Roof flashing directs rain and snowmelt away from the joint, helping prevent leaks. Look for dampness or pooling water near the proposed foundation. A low area beside the cottage, for example, may need a different approach than naturally dry, level ground.
Before choosing a footprint, assess moisture, winter snow loads and septic capacity. Check the proposed roof and its connection against local snow conditions, and plan drainage so water doesn’t collect beside the addition. Locate the septic tank and bed, preserve access, and assess system capacity against planned occupancy and plumbing.
Foundation planning matters in Muskoka’s freeze-thaw conditions. In one reported project, the builder described five to six feet of frost in winter, with screw piles installed about eight feet deep. Those figures describe that site, not a universal foundation depth. Soil, slope, drainage and the structure’s weight all influence the appropriate support. A cottage sunroom built on an existing deck also needs an assessment of whether the deck can carry it.
Bring a professional into the planning stage, before fixing the room’s size or window layout. Ask for a site review that considers sunlight, lake views, snow exposure, drainage, the cottage connection and foundation conditions together. For example, shifting a wall opening may preserve a view while avoiding a roof or siding detail that complicates the connection. Have the proposed plans address building-code review and relevant local conditions before construction begins.
Can a sunroom be heated and cooled?
A sunroom can be heated or cooled with a system suited to its design. In Canada, its effect on property taxes, insurance and resale depends on local assessment, policy terms and buyer demand.
Insulation for heating and cooling
Insulation slows heat transfer through the roof, walls and floor, helping the room hold a comfortable temperature. In a Muskoka winter, weak insulation can leave the floor and seating near the glass cold, even when a heater is running. A four-season design uses extra insulation and may extend heating or cooling into the new space. The enclosure, insulation and heating plan need to work together.
Choose the heating system alongside the enclosure rather than treating it as a finishing detail. HVAC can heat or cool a sunroom, while electric baseboard heaters provide heat and ceiling fans move air. A fan can help distribute warmth near the ceiling, but it doesn’t replace insulation. Also plan how the room will connect to the cottage’s existing heating and cooling, since that affects system design and comfort.
House wrap sits beneath exterior siding and helps protect the wall assembly from moisture and air movement. It works with insulation, not as a replacement for it. For example, even a well-insulated wall needs careful detailing around windows and joints, where gaps can let drafts or moisture through. Consider those layers together when selecting materials for a room intended for winter use.
Glass, U-values, and energy efficiency
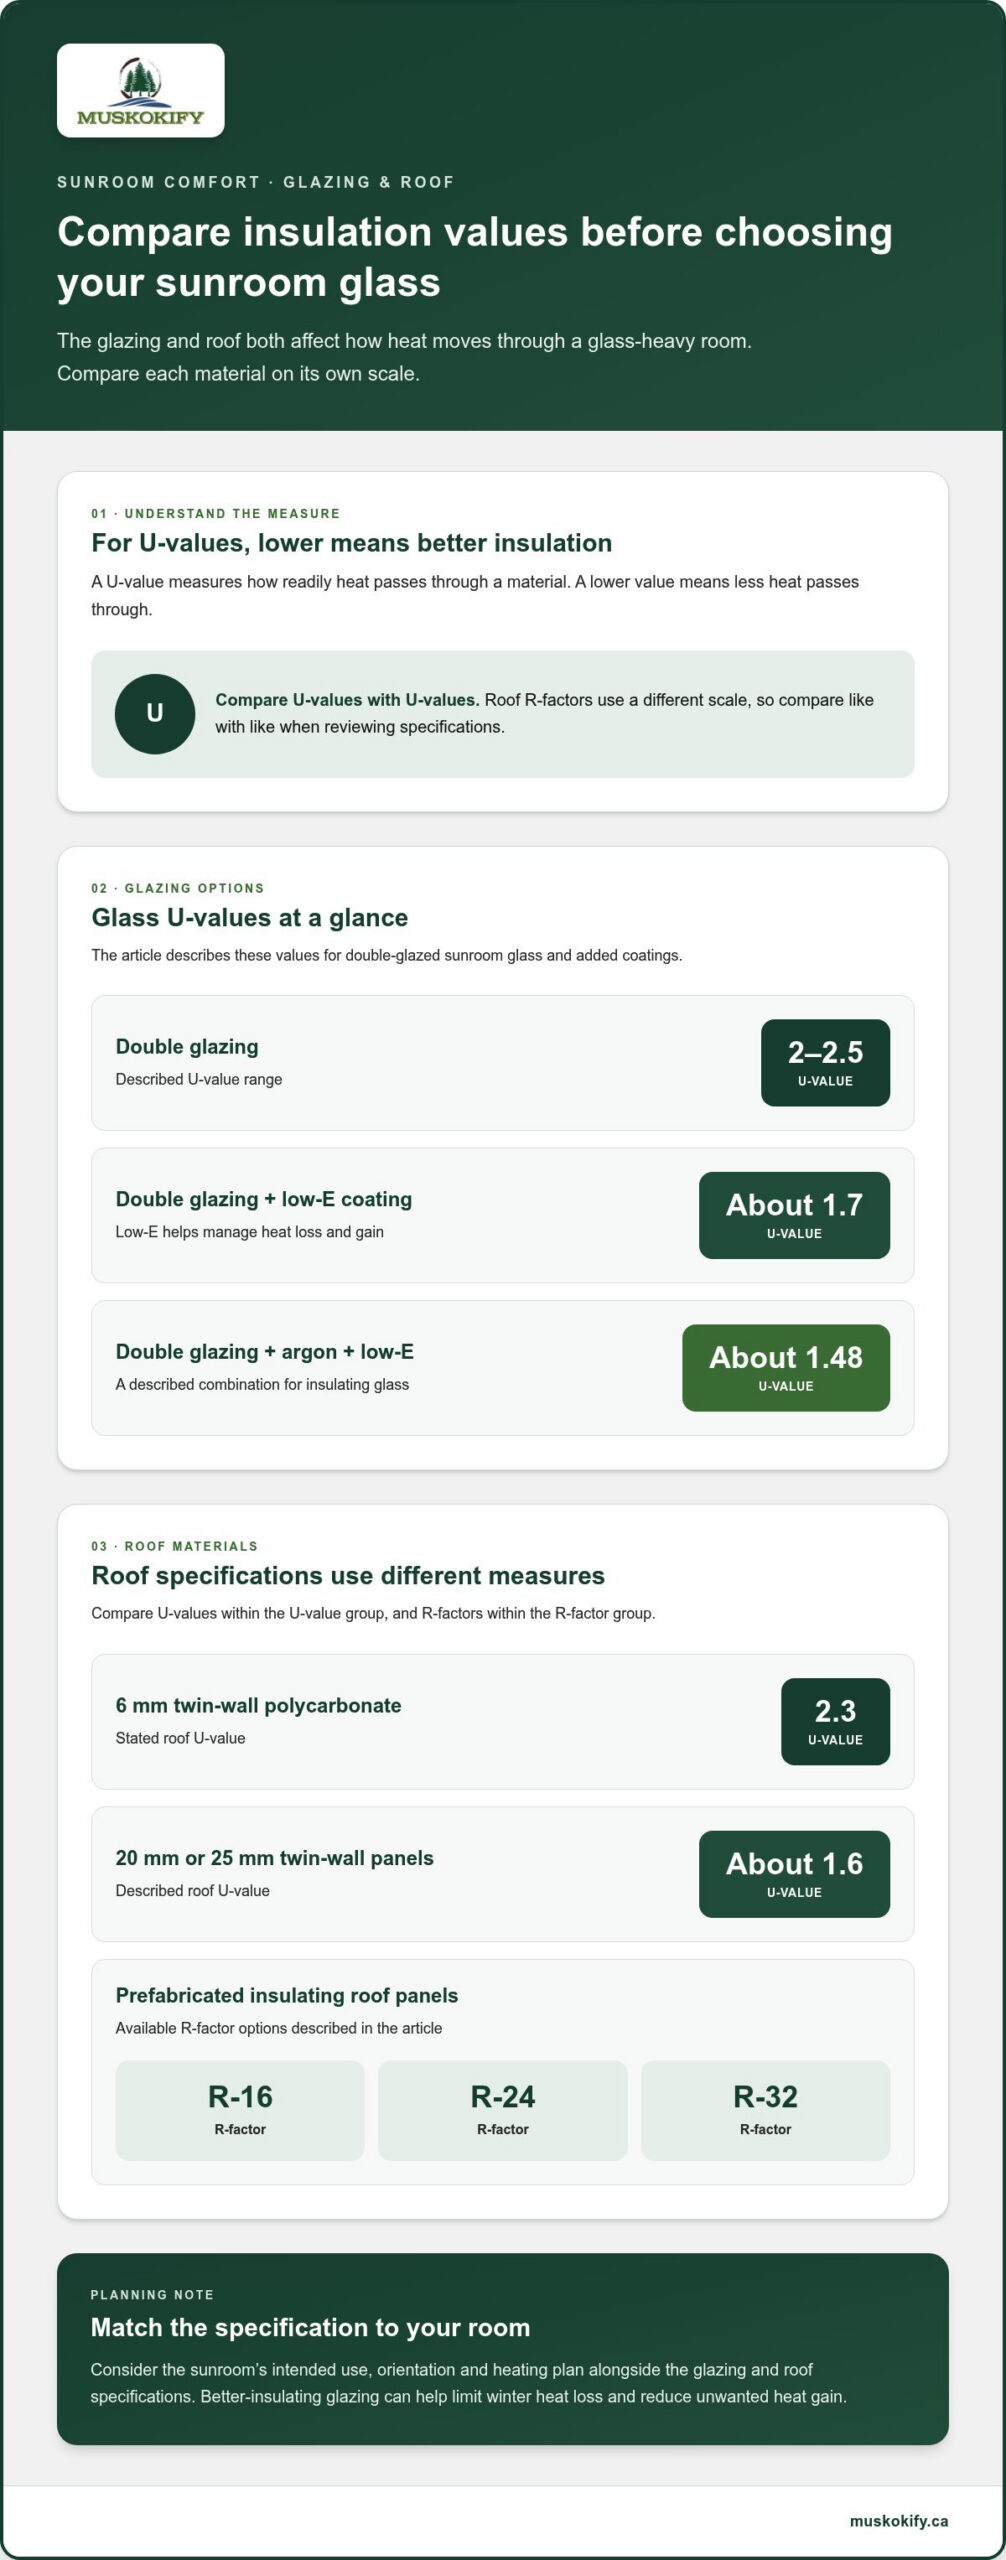
A U-value measures how readily heat passes through a material; a lower value indicates better insulation. Double-glazed sunroom glass is described with a U-value of 2 to 2.5. Adding a low-E coating, which helps manage heat loss and gain, brings the described value to about 1.7. Double glazing with argon filling and low-E coating can reach approximately 1.48.
These differences matter in a glass-heavy room. Better-insulating glazing can help limit heat escaping in winter and reduce unwanted heat gain. Low-E glass can also filter UV rays. Compare the glazing specification with the room’s intended use, orientation and heating plan instead of choosing by appearance alone. Large windows may frame a lake view beautifully, but they also make glass performance central to comfort.
Roof materials matter too. Six-millimetre twin-wall polycarbonate has a stated U-value of 2.3, while 20-millimetre and 25-millimetre twin-wall panels have a value of about 1.6. Prefabricated insulating roof panels are available with R-factors of R-16, R-24, or R-32. U-values and R-factors use different scales, so compare like with like when reviewing product specifications.
Floor insulation and vapour barriers
Floor insulation reduces heat moving through the base of the sunroom, while a vapour barrier helps limit moisture passing into the floor assembly. Together, these layers can support comfort and protect materials. The subfloor provides the firm surface beneath the finished floor, so its construction must suit the foundation and the room’s intended use.
One builder reported using 10 inches of floor insulation and a three-quarter-inch plywood subfloor. Those are details from a particular project, not universal requirements. A floor above a crawl space faces different conditions from one built over a concrete slab. Match insulation and moisture control to the foundation, then make sure the layers connect cleanly at the cottage wall and perimeter.
Moisture control affects durability as well as comfort. If warm indoor air reaches a cold surface, condensation can form; gaps around the floor edge can also invite drafts. During planning, review the insulation, vapour barrier, subfloor and finished flooring as one assembly. That can help prevent a cold strip along the windows or a damp floor after winter weather.
Three-season and four-season sunrooms
Choose the season of use before deciding how the room should be built. A three-season sunroom extends outdoor living through milder weather, while a four-season room is designed for comfort during colder months. In Muskoka, that difference matters when autumn temperatures fall and winter sunlight becomes limited. Decide whether you want a sheltered space for spring, summer and fall, or a room you’ll use throughout the year.
A three-season sunroom can offer a bright place for breakfast, reading or watching rain move across the lake. But when temperatures are low and sunlight is limited, it’s usually too cold for winter use. If your cottage is mainly a warm-weather retreat, that seasonal limitation may suit your plans. If you expect to use the space in January, a three-season room may not meet your comfort needs.
A four-season sunroom uses extra insulation and may have heating or cooling extended into the space. That added comfort can make it useful beyond the cottage’s traditional summer season, especially on cold mornings or during a snowy weekend. Consider how you’ll use the room: a quiet sitting area may need a different comfort plan from a space used for dining or regular entertaining.
Winter performance depends on more than the room’s label. A builder reported that one sunroom could warm to room temperature on a sunny day when outdoor temperatures reached -20. That example shows how sunlight can help, but it doesn’t guarantee the same result for every cottage. Room orientation, glazing, insulation and the heating system all affect indoor temperature.
Also weigh longer seasonal use against operating needs. A four-season sunroom may add to utility expenses, particularly when you heat or cool it regularly. Think through how often you’ll occupy the room, which months matter most, and whether you’ll keep the cottage heated when you’re away. Those habits help clarify whether a three-season enclosure or a four-season addition makes more sense.
A conservatory-style room can make the landscape feel close, with generous glazing framing the lake or surrounding pines. Yet a glass-rich design and a room built for winter use have different priorities. Decide whether your main goal is an airy shelter from wind and rain or a comfortable extension of indoor living. Then align the enclosure, insulation and heating plan with that choice.
Use a simple seasonal test: picture a windy October afternoon, a bright winter day and a cold evening after sunset. If you need shelter only during milder months, a three-season room may fit. If you want regular winter use, plan for a four-season design and its added heating needs. Making that decision early helps the addition serve your routines, not just frame the view.
Creating a new wall opening with structural headers
A new opening can make the cottage and sunroom feel like one connected space, but cutting an exterior wall changes its structure. The wall above the opening still needs support. A structural header, installed above the opening, carries that load toward the wall sections on either side. Its design depends on the opening width and the loads above, so don’t treat a wider doorway as a simple enlargement of an existing window.
Plan the opening alongside the sunroom’s layout. For example, a broad opening may create an easy path from the cottage dining area to a table overlooking the lake. A narrower opening may preserve more wall space for furniture and help keep the cottage’s layout intact. Mark the proposed opening on a plan, then consider how doors, windows and the new room’s floor level meet at that connection.
Header dimensions must suit the specific structure, rather than follow a size chosen from another cottage. In one described build, the city required three-ply 2 x 10 support beams. That example shows why a header needs project-specific review; it isn’t a universal specification for every addition. The roof shape, opening span and structure above all influence the support design. Keep the final header details tied to the plans for your cottage.
Coordinate the header with the sunroom roof and exterior connection before construction starts. A roof joint needs flashing to direct rain and snowmelt away from the cottage, while the wall opening must align with the new room. For instance, an opening beneath a window may not line up with the sunroom floor. Resolving these details on the drawings can help avoid changes after siding or interior finishes are removed.
A screen room can connect outdoor living with the cottage without the same enclosed feel as a fully glazed room. Either way, the opening’s placement affects circulation, sightlines and how much existing wall remains. Think through the path from the kitchen to the new space, the view from the main sitting area, and where furniture will sit. These practical choices can enhance everyday use without making the opening larger than needed.
Ask for an explanation of how the proposed header supports the wall above and how the opening meets the sunroom plans. Review the structural drawings together, including the opening location, roof connection and finish details. If the cottage has visible cracking, sagging or past alterations near that wall, include those conditions in the review. A clear plan helps coordinate the work and keeps structural support from becoming an afterthought.
Before construction, settle the opening’s size and location, then coordinate structural support, weather protection and interior access in the same plan. This helps the new passage feel intentional, whether it frames a lake view or leads into a sheltered screen room. A carefully placed opening can connect the cottage’s living area with the addition while preserving the exterior wall’s character.
Adding space to a cottage with a sunroom
A successful cottage addition connects new living space to the existing structure, foundation and daily routines. Understanding how to add a sunroom to a cottage starts with planning approvals, attachment details and how you’ll use the room.
Permits and zoning approval
For a Canadian cottage, include municipal building-permit and zoning reviews in your project plan. Prepare a site plan showing the proposed footprint, cottage, property boundaries, shoreline and septic system. These details help assess local zoning and shoreline setback requirements before construction, which matters if a lake-facing design must shift to fit the site.
Building-code review also matters. Sunrooms that qualify as accessory dwelling units are permitted projects subject to building codes. That applies to accessory dwelling units, not automatically to every sunroom. Describe the planned room’s use accurately and show how it connects to the cottage, so the approval review reflects the actual project.
Septic placement can affect where an addition fits. For example, a proposed footprint may overlap the septic bed or limit access to the system. Mark these features on the site plan before settling on dimensions. This helps you compare possible locations while keeping the cottage’s shoreline setting and existing services in view.
Planning and building the addition
Planning and building an addition means aligning its intended use, foundation and cottage connection before construction. First, decide whether the room should extend outdoor living in milder weather or provide year-round comfort. Then document the existing foundation, deck or slab, along with the proposed entrance and roof connection. These choices shape the design and work involved.
A cottage with a crawl space or basement may need additional footings or foundation walls to align with its existing structure. A concrete slab may support a sunroom directly when reinforced for stability. If you’re adding to a deck, assess whether it can carry the added weight. A former porch also needs a condition review before conversion.
Next, coordinate the wall opening, room layout and exterior details. A new opening needs a structural header above it to support the load over the sunroom walls. Plan the roof connection and flashing alongside that opening, then consider how people will move between the cottage and the new space. For example, an entrance near the dining area may create a natural path to a lake-facing sitting room.
A clear plan for how to add a sunroom to a cottage brings the site layout, foundation, wall connection, roof details, glazing and heating needs into one design. Custom-built sunrooms can be tailored to the available space and the owner’s needs. Set these priorities early, and the new room can feel like a considered extension of cottage life rather than an isolated enclosure.
Muskokify: Sunspace Sunrooms
Muskokify designs and installs Sunspace Sunrooms for cottages, tailored to the available space and how you want to use it. When you’re balancing lake views with shelter from Muskoka weather, a custom design can bring the enclosure, connection and intended season of use into one plan.
Choose details around your priorities: a bright place to sit through shoulder seasons or an enclosed area planned for year-round living. Glass Railings can preserve sightlines around a deck, while Motorized Screens can provide protection from rain and sun at the touch of a button. Each choice should support the way you’ll use the cottage while keeping the landscape in view.
Contact Muskokify to discuss your sunroom plans and the space you want to create.
Make room for more cottage moments
A sunroom can change how you experience your cottage, bringing a favourite view into everyday living. As you consider how to add a sunroom to a cottage, picture the moments you want the space to hold: a quiet morning beside the lake, a place to gather after a walk, or a comfortable pause as snow settles outside. Let that vision guide your next decisions.
Muskokify offers Sunspace Sunrooms, Glass Railings and Aluminum Railings to help shape an outdoor living space around your cottage and its surroundings. If you’re ready to explore a design that suits your property, contact Muskokify about your sunroom. Your next favourite cottage moment can start with a thoughtful plan.
Frequently Asked Questions
Should You Add a Sunroom to Your House?
Yes, if you’ll use the space often enough to make it part of your routine. Think about what currently limits your cottage: rain cutting short meals outdoors, or nowhere quiet to sit between swimming and dinner. For homes and cottages around Gravenhurst, Huntsville, Parry Sound, Midland, Tiny, Collingwood, Orillia, Barrie, Dorset, Haliburton, Mactier and Coldwater, consider how the addition will fit your property and the way you spend time there.
What are the benefits of adding a sunroom to my home?
A sunroom can create a comfortable transition between indoor routines and the cottage’s outdoor setting. Use it as a place to take off wet outerwear, enjoy a meal near the water or keep an eye on children playing outside. Consider how furniture, lighting and storage will support those activities. Planning for everyday use, rather than occasional entertaining alone, can help the new room feel useful across more of your cottage stays.
What are the most energy-efficient materials for a sunroom?
Look at the complete enclosure, not one material in isolation. Review the glazing, roof and frame information, then compare how each part contributes to limiting heat transfer. Pay attention to seals and how windows meet the frame, since gaps can undermine otherwise suitable materials. For a cottage, also consider how the selected finishes handle moisture and seasonal temperature changes.
How much does it cost to build a sunroom in Canada in 2026?
For a 2026 project, define the intended footprint, glazing, roof design, finishes and site access before setting the scope. Make a written list of what the addition includes, such as electrical work, interior finishes and connections to the cottage. This gives you a clear basis for comparing project plans and deciding which features matter most. A simple concept drawing can help communicate your priorities and avoid overlooking practical details.
What is the difference between a three-season and four-season sunroom?
A three-season room is intended for milder weather, while a four-season room is planned for use through colder months. To choose, think beyond the season names: consider how long you stay at the cottage, whether you visit during winter and what activities the room needs to support. Occasional autumn meals, for example, may call for a different design brief than regular winter weekends with family.
How do you design a sunroom addition to suit a cottage’s foundation and structure?
Begin with a measured drawing of the cottage, noting exterior doors, windows, roof edges and the intended connection point. This can reveal conflicts, such as a new wall interrupting a window or a roofline meeting the addition awkwardly. Then plan the room’s entry and furniture layout around how people move through the cottage. Keep the drawing consistent with the actual property, including any previous alterations.
What foundation is best for a sunroom addition on a cottage?
The suitable foundation depends on the site and the cottage’s existing support, so assess the ground and structure together. As a practical planning step, note changes in grade, signs of water movement and how the proposed floor will meet the cottage threshold. That information helps shape a foundation design that supports the room and creates a usable transition. A level entrance can make carrying meals or furniture between spaces easier.
How should a cottage sunroom be insulated, heated, and ventilated?
Plan insulation and heating around how you’ll use the room, and include a way to refresh the air during mild weather. Operable windows can provide natural ventilation; placing openings to encourage airflow can help prevent stale, still conditions. Think about seating before finalizing window locations, so you can enjoy fresh air and the view without making the main seating area uncomfortable.