
Tempered Glass Railing Safety Standards: What Ontario Homeowners Need to Know
What makes a clear glass railing safe on an elevated Muskoka deck? Tempered glass railing safety standards are only part of the answer. The glass, supports, layout and installation must work together. A lake view may be why you choose glass, but a product label alone can’t tell you whether the complete railing suits your home or cottage.
It’s worth looking beyond appearance, especially when a deck or balcony sits high above the ground and faces changing Ontario weather. A sound plan considers the Ontario Building Code requirements and municipal requirements that apply to your project location. This guide explains the difference between tempered and laminated glass, why hardware and installation matter, and which safety questions to resolve before choosing a system. You’ll have a practical starting point for planning a view-conscious railing that suits your property and lets you enjoy the scenery with greater peace of mind.
Key Takeaways
- Understand how tempered glass railing safety standards relate to the complete guard system, and keep building-code requirements, product documentation and installation details distinct.
- Compare tempered and laminated glass by how each is made and behaves if it breaks. Neither is unbreakable.
- Look beyond the glass panel: posts, supports, fixings and installation all contribute to the designed railing system’s performance.
- Before planning, note your deck’s edges, stairs, access points, project location and the view you want to preserve.
- Explore how Muskokify’s topless glass railings, made with 10 mm heavy-duty tempered safety glass, can suit a clear-view design for your Muskoka home or cottage.
What tempered glass railing safety standards cover in Ontario
A glass panel may look simple, but its safety depends on more than the material. A glass guardrail is a protective barrier that helps prevent people from falling from an elevated space. Tempered glass railing safety standards relate to the complete guard system, including the glass, supporting structure, connections, layout and installation.
Whether you’re planning a cottage deck overlooking Lake Muskoka or a raised porch in Barrie, the goal is to balance a clear view with a railing designed for the actual site. Building-code obligations, product information and installation details each answer different questions. One document or product claim can’t replace the other checks.
Which rules apply to an Ontario glass railing project?
The Ontario Building Code is a key source for requirements that may apply to a railing. The relevant provisions can depend on the project’s location and application, including where the railing sits and how the space is used. Requirements can change, so refer to current Ontario sources rather than relying on an old drawing, online summary or another project’s specifications.
Municipal processes matter too. Where building permits or other approvals apply, the relevant authority can clarify the process for your project location. Before finalizing the design, record whether the railing is for a deck, balcony, porch or stair. Note its edges, access points and relationship to the home. These details help frame the right code and approval questions without assuming the same rule applies to every property.
Why a product specification is not the whole safety standard
Product documentation describes a particular glass or railing component and may explain how the manufacturer intends it to be used. It can identify the glass type and thickness, for example, or outline compatible supports and installation instructions. That information is useful, but it doesn’t establish by itself that the complete assembly suits your project or meets applicable Ontario requirements.
System performance depends on how the parts work together. The glass transfers forces to its supports, and the supports and fixings connect the railing to the building structure. The design and installation need to account for those connections and the conditions at the site. A product specification can’t confirm that the deck structure or installation matches the system’s requirements.
Muskokify states that its products comply with the International Building Code (IBC). That statement alone does not establish compliance with Ontario requirements. Treat it as product information, not as a substitute for checking current Ontario Building Code provisions and any applicable municipal process for your project.
Tempered glass is heat-treated, a process that changes its strength and breakage behaviour. For a plain-language introduction, see What is Tempered Glass? A general explanation of the material isn’t project-specific approval or proof that a railing system suits a particular deck.
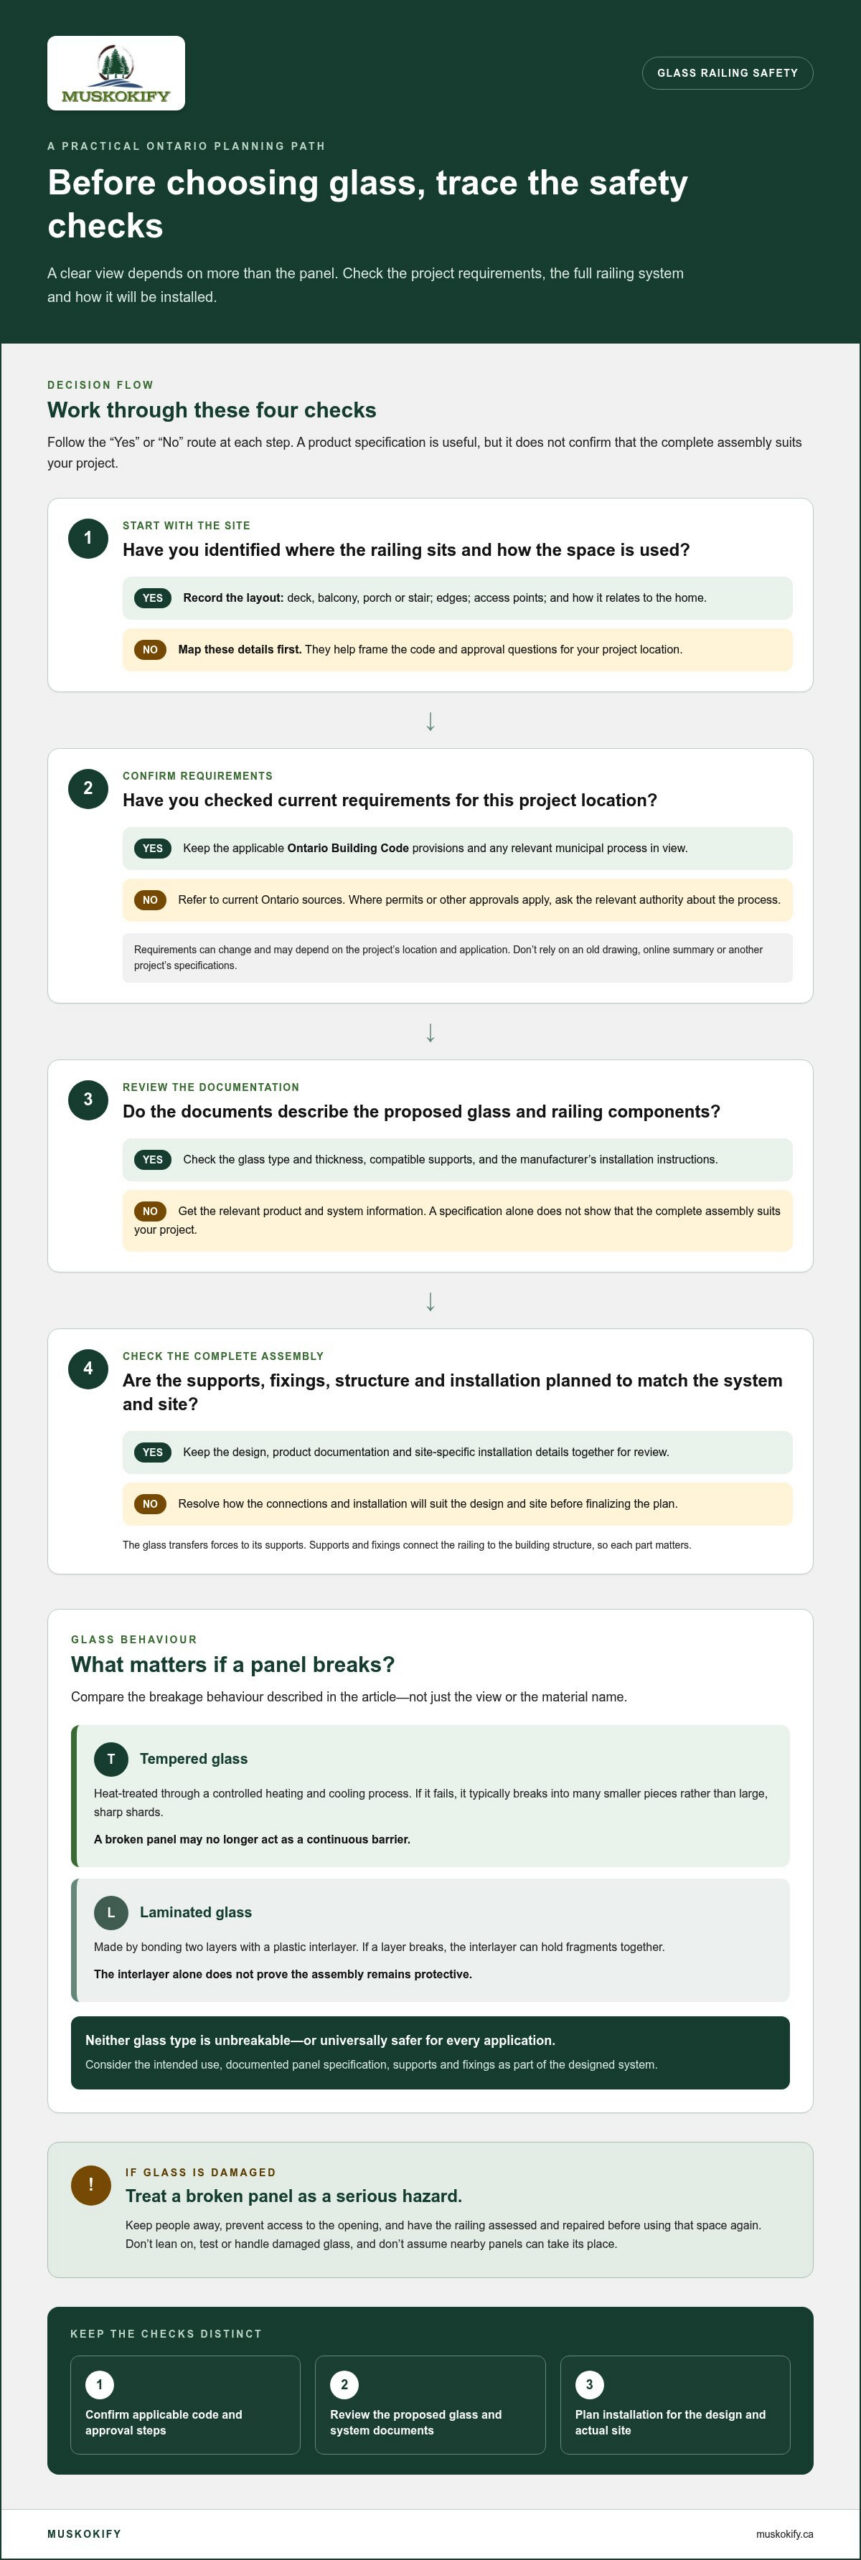
Keep three checks distinct: confirm the applicable code and approval pathway, review documentation for the proposed glass and system, and plan installation to match the design and site. This makes it easier to protect the view without mistaking a product specification for a complete safety assessment.
Tempered glass railing safety: how glass type affects breakage
The glass in a railing affects how a panel behaves if it breaks, but it doesn’t tell the whole safety story. A pane can meet a material specification while its supports, fixings or installation still need attention. For a Muskoka deck exposed to changing seasons, match the glass properties to the designed railing system and project conditions.
Tempered glass and laminated glass: what is the difference?
Tempered glass is heated and then cooled through a controlled process to change its strength and breakage pattern. If it fails, it typically breaks into many smaller pieces rather than large, sharp shards. This behaviour makes it useful in safety-glazing applications, but it doesn’t make the glass unbreakable or keep an opening protected if a panel fails.
Laminated glass is glass made by bonding two layers with a plastic interlayer, providing high resistance to shattering. If a layer breaks, the interlayer can hold fragments together. How a laminated panel performs as part of a railing depends on its specific construction and the full system design. Neither glass type is universally safer for every application. Consider the intended use, the panel’s documented specification and how it fits the supports and fixings in the designed system.
What happens when a glass railing panel breaks?
Tempered glass can break into smaller pieces, but a broken panel may no longer act as a continuous barrier. Treat a damaged or broken panel as a serious hazard, particularly on an elevated deck or balcony. Keep people away from the affected area, prevent access to the opening and have the railing assessed and repaired before using that space again.
Don’t assume a broken pane will remain in place or that nearby panels can safely take its place. With laminated glass, an interlayer may hold fragments together, but that alone doesn’t prove the assembly remains protective. Avoid leaning on, testing or handling damaged glass. The panel, its attachments and the surrounding railing need assessment as a complete assembly.
For Ontario context, the City of Ottawa’s Ontario Building Code for Glass Railings information discusses glass guards and related design considerations. Use it as a reference, not as a substitute for checking the requirements that apply to your specific project location and application.
Here’s the key principle: Choose glass to suit the intended railing system, because panel behaviour, supports, fixings and installation all contribute to safety. Before selecting a panel, note whether the design calls for tempered or laminated glass, then make sure the specifications address how that glass works with the complete assembly. If you’re planning a glass railing for your home or cottage, discuss your railing project as part of a site-specific design conversation.
Glass railing safety comparison: panels, supports, and fixings
The clear panels may be the first part of a railing you notice, but they’re only one element of its design. Posts, base channels, spigots, connectors and anchors help transfer forces through the assembly and into the deck structure. Their placement and compatibility with the glass matter. A component name or catalogue description alone doesn’t show how the complete system performs.
Consider tempered glass railing safety standards alongside the support layout and conditions at your project location. Loads and performance can’t be inferred from the glass alone. The design needs to account for the glass, its connections, the deck edge and the structure supporting the railing.
How the support system contributes to railing safety
Posts can support panels at intervals; base channels hold the lower edge of the glass; and spigots secure panels at individual connection points. Connectors join parts of the assembly, while anchors attach the railing to the supporting structure. Each component has a role, and the design needs to specify how the parts work together.
The deck edge affects what can be installed and where. A narrow edge or existing deck structure, for example, may shape anchor placement and the railing layout. On an exposed Muskoka deck, the design should reflect site conditions rather than assume a system chosen for another location will suit yours. A site review helps relate the proposed railing to the actual deck, its edges and the view you want to preserve.
Frameless and post-supported glass railings compared
Both approaches can create an open feel, but they arrange panels and supports differently. Use this comparison to clarify the design conversation, not to judge safety by appearance alone.
- Frameless: Minimal visible framing can keep sightlines open. Panels rely on their specified connections, such as base channels or spigots, and the design must account for those supports.
- Post-supported: Posts create visible divisions between panels and defined support points. The layout and connections form part of the full assembly.
Neither a sparse appearance nor more visible hardware proves a system is suitable. The glass, supports, fixings, deck edge and installation all need to align with the design and applicable project requirements.
Think about view‑optimization as you plan: arrange design elements to maximize scenic visibility without overlooking the support layout. On a deck facing a Muskoka lake, you might want fewer visual interruptions along the main outlook while still accounting for corners, stairs and access points. Muskokify’s glass railing systems can be planned in relation to the deck design and the view you hope to preserve. A clear sightline is the design goal; a complete, site-specific system is the safety plan.
A practical Ontario checklist before installing a tempered glass railing
A clear plan makes it easier to balance safety with the view you want to keep. Before choosing a railing for your cottage deck or home, work through these steps in order. They turn site details into useful design information without assuming the same requirements apply to every Ontario project.
- Define the application. Note whether the railing will protect a deck, balcony, porch, stair or another area. Record how people use the space and where they enter or move between levels. These details help establish which requirements and design considerations may apply.
- Document the deck and its edges. Sketch the railing route, corners, exposed edges, stairs and access points. Include the deck structure and edge details where you know them, along with any transitions that could affect support placement. Clear notes and photos can help a site consultation focus on the actual project rather than assumptions.
- Mark the view you want to preserve. Identify the main sightlines from places where you sit, stand or walk. On a Muskoka property, that might mean keeping the open view across the lake from the dining area while planning around a stair opening. Describe seasonal use and exposure to wind, rain, snow and temperature changes too. These conditions inform design discussions, but they don’t replace code requirements.
- Verify current requirements for your project location. Check the applicable Ontario Building Code provisions for the specific railing application. Then verify local municipal requirements and whether building permits or other approvals apply. Don’t rely on another property’s permit experience or an older online summary; the relevant authority can clarify the current process for your project.
- Review the system documentation against the design. Keep the proposed glass specifications and documentation together with details for the supports, hardware and fixings. Check that they describe the same intended configuration and installation. A glass specification alone doesn’t establish how the full assembly performs, and a component description doesn’t prove that it suits your deck structure.
- Plan installation, review and care. Make sure the installation plan follows the system’s documented requirements and accounts for the deck edge and supporting structure. Establish how the completed work will be reviewed under the applicable project process. Keep manufacturer guidance for cleaning, care and maintenance so you know how to look after the railing over time.
This checklist gives you a practical starting point for applying tempered glass railing safety standards to your property. With site details, approvals and system documentation organized, you can move into design with a clearer understanding of the decisions ahead. To plan a glass railing around your deck layout and desired view, discuss your glass railing project with Muskokify.
Muskokify glass railings: safety-minded design for Muskoka views
A glass railing can mark the edge of your deck without putting a solid visual barrier between you and the lake, trees or changing seasons. A good layout starts with your property: where you spend time outdoors, which views matter most, how the deck is arranged and what conditions the railing will face. For a cottage in Huntsville or a home overlooking Georgian Bay, these details help shape a design that feels connected to its setting.
How professional site consultation supports project planning
A site consultation brings the deck, proposed railing route, sightlines and project location into the same conversation. You can point out a favourite view from the dining area, note stairs and access points, and describe how you use the outdoor space across the seasons. The goal is to align those practical details with the glass, supports and installation plan, rather than treating the panel as a stand-alone choice.
Muskokify designs and installs glass railings for homes and cottages in Muskoka and surrounding communities, including Gravenhurst, Huntsville, Parry Sound, Midland, Tiny, Collingwood, Orillia, Barrie, Dorset, Haliburton, Mactier and Coldwater. Its glass railing solutions can be planned around your layout and desired view. Muskokify’s topless glass railings use 10 mm heavy-duty tempered safety glass. Separately, Muskokify typically specifies 13.52 mm laminated tempered glass in its projects. These are distinct specifications, not interchangeable descriptions of the same panel.
Use the consultation to connect the chosen glass specification with the designed railing system and the site. The deck edge and supporting structure, hardware and installation plan all matter. If your property is exposed to Muskoka’s seasonal weather, share that context as part of the design discussion. It helps inform project planning, but it doesn’t replace verification of the requirements that apply to your railing.
A refined view with a considered safety approach
Glass can define an outdoor edge while letting your eyes travel across the water or treeline. A thoughtful layout considers where posts or other supports appear, how the railing meets stairs and corners, and which sightlines you want to keep open. This balance makes a clear view feel intentional while keeping the system’s functional details in the design.
Good planning connects appearance with documentation and installation. Confirm the current requirements for your project location and application, then make sure the glass, hardware and complete designed assembly are consistent with the approved plan. A product specification or minimal look alone can’t establish that the installed railing meets applicable requirements. Final compliance depends on those requirements and the complete system as installed.
With more than 10 years selling and installing glass railings across Ontario, Muskokify brings project experience to homes and cottages where the view is part of daily life. Start a conversation about your deck, preferred sightlines and project conditions. Plan a glass railing consultation for your Muskoka property.
Bring your view into the design
Start with how you want to use your outdoor space. Picture a quiet morning overlooking the lake or an evening with family on the deck. Those moments can guide choices about the railing’s placement and appearance, while keeping practical safety considerations in the design from the beginning.
Think of tempered glass railing safety standards as part of shaping a railing that belongs on your property, not as a detail to address at the end. A project conversation can bring your priorities and the site together, giving the design a clear direction before installation planning moves ahead.
Take the next step toward a clear-view railing for your home or cottage. Plan your glass railing project with Muskokify and start shaping an outdoor space you’ll love spending time in.
Frequently Asked Questions
Is tempered glass safe for a deck railing?
Tempered glass can be suitable for a deck railing when the glass specification, supports, fixings and installation are designed for the project. “Tempered” describes how the glass is made, not whether an entire railing is safe in every setting. For a deck in Gravenhurst or Huntsville, consider the railing’s location and intended use, then verify the complete system against requirements that apply to that project.
Does Ontario have a specific safety standard for glass railings?
Ontario’s Building Code is a key source for applicable guard requirements, but the relevant provisions depend on the railing’s application and project location. Municipal approval or permit processes may also apply. For a cottage in Parry Sound or a home in Barrie, check current provincial information and the relevant municipality’s requirements for that specific project rather than relying on a general glass specification or another property’s approval.
Can tempered glass be cut or drilled after it is made?
No. Cutting or drilling tempered glass after the heat-treatment process can cause it to break. Any required holes, notches or edge work need to be planned before tempering and made as part of the glass manufacturing process. If a panel’s dimensions or hardware layout need to change, don’t attempt to modify it on site; have the proposed change assessed against the system design.
What should I do if a glass railing panel breaks?
Keep everyone away from the damaged panel and prevent access to the affected section, including from nearby stairs or doors. Don’t touch loose fragments or try to remove the panel. If the deck is at a seasonal cottage in Haliburton or Dorset, keep the area blocked off between visits. Arrange for the assembly to be assessed and repaired before people use that part of the deck again.
How can I tell whether glass is tempered?
Look for a permanent marking or label on the glass, often near a corner, and compare it with the product or installation documents. The mark may identify the glass as tempered, but don’t rely on appearance alone: clear glass can look similar across different types. If the marking is missing or hard to read, use the project records to identify the panel rather than testing it yourself.
How often should I inspect a glass railing?
Follow the manufacturer’s care and inspection guidance for your specific system; there isn’t one inspection interval that applies to every railing. As part of routine upkeep, look for visible cracks, chips, loose hardware or changes around the panel supports, and keep damaged areas out of use. After a noticeable impact or movement in the railing, arrange an assessment instead of waiting for a scheduled check.